Table of Contents
ToggleIntroduction
Welcome to our quick start guide on Spring Boot Simplified for Beginners! Whether you’re a seasoned Java developer or just starting, Spring Boot makes building robust applications a breeze. In this guide, we’ll break down everything you need to know to get your first Spring Boot application up and running.
What is Spring Boot?
Spring Boot is an open-source Java-based framework used to create stand-alone, production-grade Spring-based applications quickly and with minimal configuration. It simplifies the process of building applications by providing a suite of tools and libraries that help streamline development.
Why Use Spring Boot?
Spring Boot removes much of the boilerplate configuration required by Spring, allowing you to focus more on developing features and less on setup. It offers a wide range of features, including embedded servers, simplified dependency management, and production-ready metrics.
Setting Up Your Development Environment
Installing Java Development Kit (JDK)
To develop with Spring Boot, you need to have the JDK installed on your machine. Download and install the latest version from the Oracle JDK website.
Setting Up an Integrated Development Environment (IDE)
An IDE helps streamline coding by providing tools and features like code completion, debugging, and version control integration. Eclipse, IntelliJ IDEA, and VS Code are the most popular IDE used by developers for Java. Download and install your preferred IDE.
Installing Spring Boot CLI
Spring Boot CLI is a command-line tool that helps you develop Spring Boot applications. It can be installed via SDKMAN! or manually downloaded from the Spring Boot website. Use the following command to install via SDKMAN!:
sdk install springbootCreating Your First Spring Boot Application
Initializing a Project with Spring Initializr
Spring Initializr is an online tool that helps generate a Spring Boot project structure. Visit Spring Initializr, select the desired project options (like dependencies, project name, and packaging), and generate the project. Download the zip file and extract it. Below is the screenshot with very basic Spring web and few database related dependencies required to build REST APIs

Understanding the Project Structure
The basic Spring boot project structure is similar to the Maven project structure if you are using Maven as a build tool. You can read more about Maven and its project structure here. You can see compilation errors in your IDE but if you wait for some time, all dependencies will be downloaded and errors will be gone The generated project structure includes several key components:
- src/main/java: Contains your Java source files. It contains the starter class ‘SpringDemoApplication’ which is the entry point of the application
- src/main/resources: Contains application properties and static resources.
- pom.xml or build.gradle: Manages your project’s dependencies. Since I selected Maven as option so pom.xml is generated

Spring Boot Annotations
Annotations in Java are metadata that provide information about the code. They do not directly affect the execution of the code but help in understanding and managing it. Consider annotations as signposts that guide the Spring framework in handling various components and configurations.
Annotation itself is a big topic and you can read more about annotation here
Below are a few annotations to create a REST web service application
@SpringBootApplication
This annotation is a single annotation that packages below mentioned annotation. This is the annotation on the starter class ‘SpringDemoApplication‘
- @Configuration: This annotation tells the spring to make a class as the candidate of bean definitions.
- @EnableAutoConfiguration: Enables Spring Boot’s auto-configuration mechanism.
- @ComponentScan: This annotation tells the spring the starting point for the bean scanning.
@RestController
This annotation marks the class as a RESTful web service controller. It combines @Controller and @ResponseBody, simplifying the creation of RESTful web services.
@RequestMapping
This annotation maps the request handler method to the incoming web request. @Request mapping can be set either to class level or any method level.
Building a Simple REST API
Creating a Controller
Create a new Java class annotated with @RestController in your project’s source directory(i.e src/main/java). This annotation will be available as part of Spring web dependency.
@RestController
public class HelloController {
    @RequestMapping("/hello")
    public String hello() {
        return "Hello, Spring Boot!";
    }
}
Defining Endpoints
Endpoints are defined using @RequestMapping or more specific annotations like @GetMapping, @PostMapping, etc. The example above defines a simple /hello endpoint.
Testing the API with Postman
Run the starter class ‘SpringDemoApplication’ as shown below

Once application is up and running,

Download and install Postman, a popular tool for testing APIs. Open Postman, enter the endpoint URL (e.g., http://localhost:8080/hello), and send a GET request to see the response.

Connecting to a Database
Setting Up a Database
You can use any relational database like MySQL, PostgreSQL, or H2. For this example, we’ll use H2, an in-memory database that doesn’t require any software installation. Spring boot creates automatically this database in the application memory
Configuring Spring Boot for Database Access
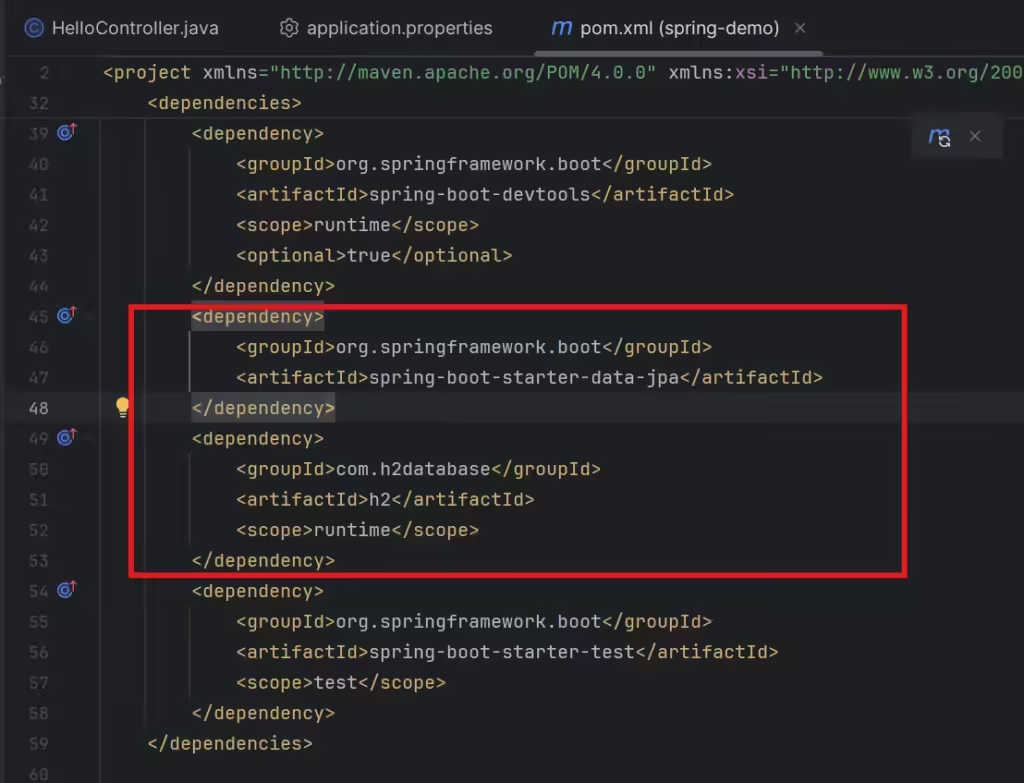
Add the necessary database dependencies to your pom.xml if not added during project creation

<dependency>
    <groupId>org.springframework.boot</groupId>
    <artifactId>spring-boot-starter-data-jpa</artifactId>
</dependency>
<dependency>
    <groupId>com.h2database</groupId>
    <artifactId>h2</artifactId>
    <scope>runtime</scope>
</dependency>
Creating a Entity Class
This class models the database table
package com.aneesh.spring_demo;


import jakarta.persistence.Entity;
import jakarta.persistence.Id;
import jakarta.persistence.GeneratedValue;
import jakarta.persistence.GenerationType;

@Entity
public class User {

    @Id
    @GeneratedValue(strategy = GenerationType.AUTO)
    private Long id;

    private String firstName;
    private String lastName;

    // Constructors
    public User() {}

    public User(String firstName, String lastName) {
        this.firstName = firstName;
        this.lastName = lastName;
    }

    // Getters and Setters
    public Long getId() {
        return id;
    }

    public void setId(Long id) {
        this.id = id;
    }

    public String getFirstName() {
        return firstName;
    }

    public void setFirstName(String firstName) {
        this.firstName = firstName;
    }

    public String getLastName() {
        return lastName;
    }

    public void setLastName(String lastName) {
        this.lastName = lastName;
    }

    // toString method
    @Override
    public String toString() {
        return "User{" +
                "id=" + id +
                ", firstName='" + firstName + '\'' +
                ", lastName='" + lastName + '\'' +
                '}';
    }
}
Creating a Repository
Create a repository interface that extends JpaRepository. This will provide CRUD operations for your entity.
package com.aneesh.spring_demo;

import org.springframework.data.jpa.repository.JpaRepository;

public interface UserRepository extends JpaRepository<User, Long> {
}
This interface will provide basic CRUD operations on User
Updating Controller class
Update the controller class to call this repository and return list of User
package com.aneesh.spring_demo;

import org.springframework.beans.factory.annotation.Autowired;
import org.springframework.web.bind.annotation.RequestMapping;
import org.springframework.web.bind.annotation.RestController;

import java.util.List;

@RestController
public class HelloController {
    @Autowired
    UserRepository userRepository;
    @RequestMapping("/hello")
    public List<User> hello() {
       List<User> users= userRepository.findAll();
        return users;
    }
}
Managing Application Properties
Till now we have created all the required classes but we haven’t provided details of our h2 database. This can be done easily by adding some properties in application. properties
spring.application.name=Spring Demo
spring.datasource.url=jdbc:h2:mem:testdb
spring.datasource.driverClassName=org.h2.Driver
spring.datasource.username=sa
spring.datasource.password=

spring.jpa.show-sql=true
spring.jpa.properties.hibernate.dialect=org.hibernate.dialect.H2Dialect
spring.jpa.hibernate.ddl-auto= update

spring.h2.console.enabled=true
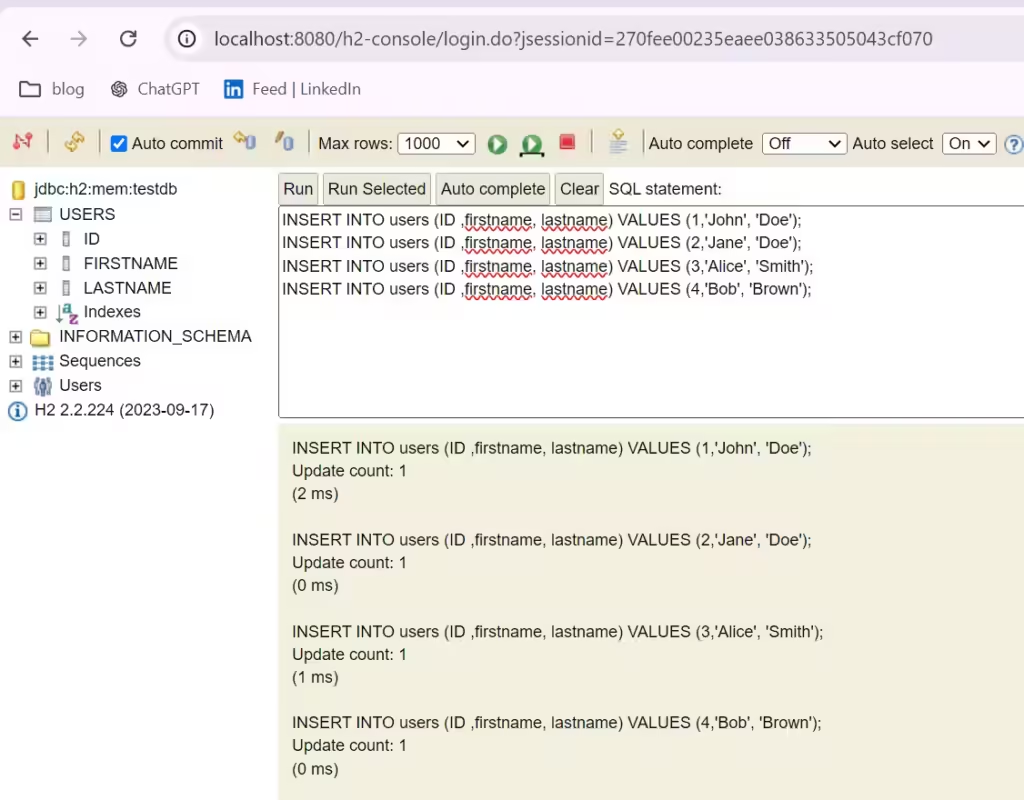
Inserting data to h2 DB
We can insert rows into DB 2 ways
- Create a file named data.sql inside resources folder and run the application. Application will automatically insert the data
- Log into the h2 console from browser( localhost:8080/h2-console) after running the application

Now call the APAI from postman to see the results

Spring Boot Starters
What Are Spring Boot Starters?
Starters are dependency descriptors that simplify adding jars to your project. For example, spring-boot-starter-web includes all dependencies needed to build a web application.
Commonly Used Starters
- spring-boot-starter-web: For building web applications.
- spring-boot-starter-data-jpa: For JPA and Hibernate.
- spring-boot-starter-security: For Spring Security.
Spring Boot DevTools
Enabling DevTools
Add the DevTools dependency to your project for features like automatic restarts and live reloads.
<dependency>
    <groupId>org.springframework.boot</groupId>
    <artifactId>spring-boot-devtools</artifactId>
    <optional>true</optional>
</dependency>
Benefits of Using DevTools
DevTools enhances the development experience by providing rapid feedback during code changes without requiring a full application restart.
Spring Boot Actuator
Introduction to Spring Boot Actuator
Spring Boot Actuator provides production-ready features like monitoring and metrics gathering. Add the dependency to your project:
<dependency>
    <groupId>org.springframework.boot</groupId>
    <artifactId>spring-boot-starter-actuator</artifactId>
</dependency>
Monitoring and Managing Your Application
Actuator provides several endpoints (e.g., /actuator/health, /actuator/metrics) to monitor your application’s health and metrics.
Handling Exceptions
Define custom exception classes to handle specific errors.
public class ResourceNotFoundException extends RuntimeException {
    public ResourceNotFoundException(String message) {
        super(message);
    }
}
Implementing Global Exception Handling
To implement a global-level exception handler. Use @ ControllerAdvice annotation on the class level
@ControllerAdvice
public class GlobalExceptionHandler {
    @ExceptionHandler(ResourceNotFoundException.class)
    public ResponseEntity<String> handleResourceNotFoundException(ResourceNotFoundException ex) {
        return new ResponseEntity<>(ex.getMessage(), HttpStatus.NOT_FOUND);
    }
}
Securing Your Application
Introduction to Spring Security
Spring Security is the feature in the Spring framework that provides security to the exposed resources in the application. Add the Spring Security starter to your project:
<dependency>
    <groupId>org.springframework.boot</groupId>
    <artifactId>spring-boot-starter-security</artifactId>
</dependency>
Basic Authentication and Authorization
Configure basic authentication by extending WebSecurityConfigurerAdapter
@Configuration
@EnableWebSecurity
public class SecurityConfig extends WebSecurityConfigurerAdapter {
    @Override
    protected void configure(HttpSecurity httpSecurity) throws Exception {
        http.authorizeRequests()
            .anyRequest().authenticated()
            .and()
            .httpBasic();
    }
}
Deploying Your Spring Boot Application
Packaging the Application
Build tools like Maven or Gradle can be used to package your application into a jar. To learn more about Maven, please have a look at this post.
mvn clean packageDeploying to a Web Server
Deploy the JAR file to any web server like Apache Tomcat by placing it in the web server’s webapps directory.
Deploying to the Cloud
Deploy your Spring Boot application to cloud platforms like AWS, Azure, or Google Cloud using their respective services and tools.
Spring Boot Best Practices
Code Organization
Organize your code into packages based on functionality (e.g., controller, service, repository) for better maintainability.
Performance Optimization
Optimize performance by using caching, database connection pooling, and efficient querying.
Testing Strategies
Implement unit tests, integration tests, and end-to-end tests to ensure your application works as expected.
Conclusion
Congratulations! You’ve now got a basic understanding of how to set up and develop with Spring Boot. From setting up your development environment to building and deploying your first application, you’ve learned the essential steps to get started. Spring Boot simplifies the development process, allowing you to focus on building features and delivering value to your users.
FAQs
- What is Spring Boot used for? Spring Boot is used to create stand-alone, production-grade Spring-based applications quickly and with minimal configuration.
- How do I install Spring Boot? You can install Spring Boot CLI via SDKMAN! or manually download it from the Spring Boot website.
- What is the advantage of using Spring Boot? Spring Boot simplifies the configuration and setup of Spring applications, reducing development time and effort.
- Can I use Spring Boot with other databases? Yes, Spring Boot supports various databases like MySQL, PostgreSQL, MongoDB, and more.
- Is Spring Boot suitable for beginners? Absolutely! Spring Boot is designed to simplify the development process, making it an excellent choice for beginners.
Happy coding with Spring Boot! I hope this guide helps you embark on your spring boot learning journey


7 Responses