Spring AI is the new term in Spring framework. AI development has traditionally been closely associated with the Python programming language, given its rich ecosystem of libraries and frameworks tailored for AI and machine learning. However, recent advancements in the Spring framework have opened up new possibilities, allowing developers to leverage AI capabilities directly within Java. This integration bridges the gap between Java and AI, enabling Java developers to build intelligent applications without needing to switch to Python. These new capabilities in Spring are set to transform how AI is implemented in enterprise-grade applications, combining Java’s robustness with cutting-edge AI technologies.
Table of Contents
ToggleBelow is the step by step guide to use Spring AI
Setting Up the Development Environment
Install Java Development Kit (JDK)
Ensure you have the latest JDK installed. This file is available for download on Oracle’s platform . After installation, verify it with:
java -versionInstall Maven
Maven is essential for managing dependencies in a Spring Boot project. Install Maven from Maven’s official website and verify the installation with:
mvn -vIf you are interested in learning more about Maven, please read my detailed article on Maven
Create a New Spring Boot Project
The best way to generate a Spring Boot project is by using Spring Initializr. Go to start.spring.io, select your project settings (Java, Maven, Spring Boot version), and add the following dependencies:
- Spring Web
- Spring Boot Starter
- spring-ai-openai-spring-boot-starter
Download the project, extract it, and open it in your preferred IDE (e.g., IntelliJ IDEA, Eclipse).
Add the OpenAI Spring Boot Starter Dependency
In your pom.xml, ensure you have the following dependency to use the OpenAI Spring Boot Starter:
<dependency>
	<groupId>org.springframework.ai</groupId>
	<artifactId>spring-ai-openai-spring-boot-starter</artifactId>
</dependency>
Configuring OpenAI in Your Spring Boot Application
Setting Up the OpenAI API Key
To interact with OpenAI, you need an API key. Register at OpenAI’s official website to get your API key.
Add the API key to your application.properties:
spring.application.name=springaistudy
spring.ai.openai.api-key=${SPRING_AI_OPEN_AI_API_KEY}
Create the OpenAI Service
Create a service class to interact with OpenAI’s API. The service will handle requests and generate AI responses. Here we are using ChatClient interface which does the call to openai api but we need to build this implementation using ChatClient.Builder. Further PromptTemplate and Prompt classes are used to create prompt which is used by ChatClient and response is given as ChatResponse.
package com.aneesh.springai.springaidemo.service;
import com.aneesh.springai.springaidemo.models.ChatInput;
import com.aneesh.springai.springaidemo.models.ChatOutput;
import org.springframework.ai.chat.client.ChatClient;
import org.springframework.ai.chat.model.ChatResponse;
import org.springframework.ai.chat.prompt.Prompt;
import org.springframework.ai.chat.prompt.PromptTemplate;
import org.springframework.stereotype.Service;
@Service
public class OpenAIService {
private final ChatClient chatClient;
    public OpenAIService(ChatClient.Builder chatClientBuilder ) {
        this.chatClient = chatClientBuilder.build();
    }
    public ChatOutput getResponse(ChatInput chatInput){
        PromptTemplate promptTemplate= new PromptTemplate(chatInput.input());
        Prompt prompt = promptTemplate.create();
        ChatClient.ChatClientPromptRequest chatClientPromptRequest=  chatClient.prompt(prompt);
         ChatClient.ChatClientRequest.CallPromptResponseSpec callPromptResponseSpec= chatClientPromptRequest.call();
        ChatResponse chatResponse= callPromptResponseSpec.chatResponse();
        return new ChatOutput(chatResponse.getResult().getOutput().getContent());
    }
}
Building a Basic AI-Powered API
Create a Controller to Handle Requests
package com.aneesh.springai.springaidemo.controller;
import com.aneesh.springai.springaidemo.models.ChatInput;
import com.aneesh.springai.springaidemo.models.ChatOutput;
import com.aneesh.springai.springaidemo.service.OpenAIService;
import org.springframework.web.bind.annotation.PostMapping;
import org.springframework.web.bind.annotation.RequestBody;
import org.springframework.web.bind.annotation.RestController;
@RestController
public class ChatController {
    private final OpenAIService openAIService;
    public ChatController(OpenAIService openAIService) {
        this.openAIService = openAIService;
    }
    @PostMapping("/chatmessage")
    public ChatOutput chat(@RequestBody ChatInput chatInput){
        ChatOutput chatOutput= openAIService.getResponse(chatInput) ;
        return chatOutput;
    }
}
Here we have used ChatInput and ChatOutput which is Record type
package com.aneesh.springai.springaidemo.models;
public record ChatInput(String input) {
}
package com.aneesh.springai.springaidemo.models;
public record ChatOutput(String output) {
}
you can find the code in my github repo
Testing Your API
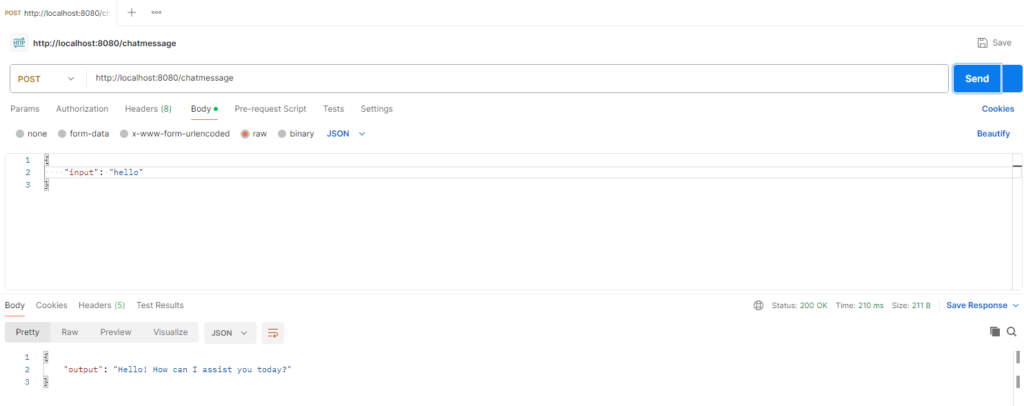
Run your application using mvn spring-boot:run and test your API with a POST request:

Deploying Your Application
Preparing for Deployment
Before deploying, ensure that your application is secure and production-ready. This includes managing API keys securely, optimizing the performance, and adding necessary configurations.
Deploy to a Cloud Platform
Deploy your application to a cloud platform such as AWS, Azure, or Heroku. You can use Docker to containerize your application, making it easier to manage and deploy.
# Dockerfile
FROM openjdk:11
COPY target/springai.jar springaidemo.jar
ENTRYPOINT ["java", "-jar", "/springaidemo.jar"]
Exploring Advanced AI Features
Implementing AI-Driven Features
Explore advanced features like sentiment analysis, text summarization, or real-time language translation by customizing your PromptTemplate and processing the AI responses accordingly.
Building Interactive Chatbots
Create conversational chatbots that can engage users in real-time. Use the AI responses to build a dialogue loop, providing contextual and relevant replies based on user input.
Enhancing Security and Privacy
Enhance your application’s security by implementing measures such as API key management, request throttling, and encryption. Make sure to comply with privacy regulations like GDPR to protect user data.
Conclusion
By following this step-by-step guide, you’ve successfully integrated OpenAI’s powerful capabilities into a Spring application using the spring-ai-openai-spring-boot-starter. You’ve learned how to set up the environment, create dynamic AI-powered responses, and explore advanced AI features. This knowledge empowers you to build smarter, AI-driven applications that stand out in the competitive tech landscape.


One Response