


Are you tired of manually configuring and deploying applications on multiple servers? Do you wish there was a way to automate these tasks and save time? Look no further than Ansible, an open-source automation tool that’s easy to learn and use. In this comprehensive Ansible tutorial, we’ll guide you through the basics of Ansible and show you how to automate like a pro in just 10 minutes.
Introduction
In today’s fast-paced IT world, automation is the key to efficiency. If you’re looking to automate repetitive tasks, Ansible is a tool you need to know. But what exactly is Ansible, and why should you care? Let’s dive into the world of Ansible, starting with this Ansible tutorial.
What is Ansible?
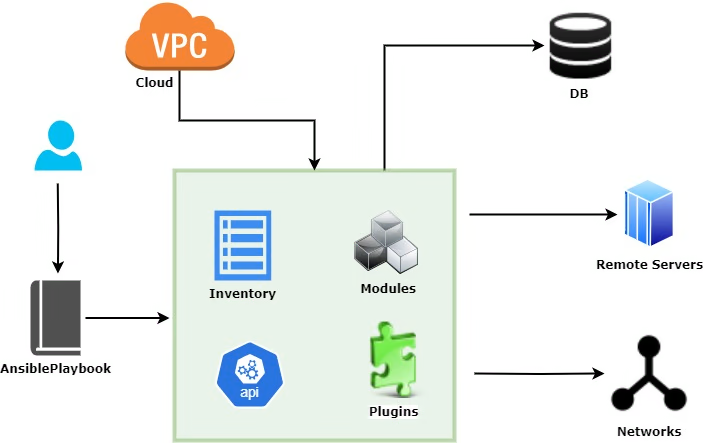
Ansible is a powerful tool for automating tasks on remote servers, networks, and cloud resources. It’s designed to be simple, flexible, and scalable, perfect for DevOps teams, system administrators, and IT professionals. With Ansible, you can automate tasks like updating packages and restarting services to complex workflows involving multiple servers and applications. It’s agentless, so you don’t need to install any software on the target machines, making it lightweight and easy to use.
Why Learn Ansible?
If you want to automate your IT environment, reduce human error, and save time, learning Ansible is a smart move. It’s widely used in the industry, from startups to Fortune 500 companies, due to its simplicity and power.
Key Features of Ansible
- Agentless Architecture: No need to install agents on target systems.
- Declarative Language: Ansible uses YAML, making it easy to write and understand.
- Idempotency: Ensures that operations produce the same results every time.
Ansible Tutorial: With Ansible Hands-on
Now that you understand the basics, let’s put Ansible into action with some Ansible examples
Step 1: Installing Ansible
Prerequisites
- A Linux, macOS, or Windows machine
- Python installed on your system (Ansible requires Python 2.7 or higher)
Let’s walk through the Ansible installation process for different operating systems.
Installing Ansible on Linux
- Open your terminal.
- Update your package manager:
sudo apt-get updateInstall Ansible:
sudo apt-get install ansibleInstalling Ansible on macOS
- Install Homebrew:
/bin/bash -c "$(curl -fsSL https://raw.githubusercontent.com/Homebrew/install/HEAD/install.sh)"- Install Ansible using Homebrew:
brew install ansibleInstalling Ansible on Windows
- First Install the WSL which adds the Linux capabilities in Windows.
- Install Ansible in the WSL environment using the Linux installation steps.
- Verifying the Installation
ansible --versionThis command will display the version of Ansible installed, confirming that it’s ready to use.
Step 2: Setting Up the Inventory File
The inventory is a file that defines the hosts (servers) where you want to run your tasks. It can be a simple text file listing IP addresses or a more complex dynamic inventory.
Let’s create a simple inventory file called `hosts` with two hosts: `localhost` and `myserver.com`.
[localhost]
127.0.0.1
[myserver.com]
192.168.1.100
Step 3: Creating Your First Playbook
Playbooks are the heart of Ansible automation. They are YAML files where you define the tasks you want to perform. A playbook is a set of tasks that you want to execute on your managed hosts. Let’s start with a Basic Ansible Example and create a simple playbook called `hello.yml` that prints “Hello, World!” on both hosts.
- name: Hello, World!
  hosts: localhost,example.com
  tasks:
   - name: Print message
     debug:
      msg: "Hello, World!"
In this playbook, we’re targeting both `localhost` and `example.com`. We then execute a single task that prints the message “Hello, World!” using the `debug` module.
Step 4: Running Your Playbook
Now it’s time to run your Ansible Playbook! Use the following command:
ansible-playbook -i hosts hello.ymlThis will execute the tasks in `hello.yml` on both `localhost` and `example.com`.
Step 5: Automating Tasks with Ansible Modules
Understanding Ansible Modules
Ansible Modules are the core components that drive Ansible’s automation capabilities, enabling users to execute tasks across multiple systems effortlessly. These modules are like specialized tools in a toolkit, each designed for a specific purpose, such as managing packages, configuring services, or handling files. For instance, if you want to install software on a remote server, you can use the apt or yum module depending on the operating system.
Commonly Used Ansible Modules
- apt: Manages packages on Debian-based systems
- yum: Manages packages on RHEL systems
- service: Manages services
Using Ansible modules in playbook
Let’s use the `yum` module to update packages on `example.com`.
- name: Update packages
  hosts: myserver.com
  tasks:
   - name: Update packages
     yum:
      name: "*"
      state: latest
In this playbook, we’re targeting `myserver.com` and using the `yum` module to update all packages on that host.
Step 6: Using Ansible Roles
Understanding Ansible Roles
Roles are like building blocks that you can combine to create a complete automation solution. For example, you might have one role dedicated to installing and configuring a web server, another for setting up a database, and yet another for securing the server. By breaking down tasks into roles, you can reuse them across different projects or environments, saving time and effort
Creating an Ansible Role
Let’s say you want to create a role to install and configure nginx. First, you would create a directory structure for the role:
$ ansible-galaxy init nginxThis command generates a basic role directory structure like this:
nginx/

├── defaults

│   └── main.yml

├── handlers

│   └── main.yml

├── tasks

│   └── main.yml

├── templates

│   └── nginx.conf.j2

├── files

├── vars

│   └── main.yml

└── meta

    └── main.yml
Using Ansible Roles in a Playbook
Once the role is created, you can use it in your playbook. For instance, here’s how you would include the nginx role in a playbook ‘site.yml’:
- hosts: webservers
  roles:
   - nginx
In this example, the playbook will automatically execute the tasks defined in the nginx role.
Example: Configuring nginx with a Role
Suppose you want to install nginx and apply a custom configuration. You would define the tasks in nginx/tasks/main.yml:
# tasks file for nginx role
- name: Install nginx
  apt:
   name: nginx
   state: present
- name: Copy nginx configuration file
  template:
   src: nginx.conf.j2
   dest: /etc/nginx/nginx.conf
- name: Ensure nginx is running
  service:
  name: nginx
  state: started
And you could place your nginx.conf template in the nginx/templates/nginx.conf.j2 file. An example template might look like this:
server {
    listen 80;
    server_name {{ ansible_fqdn }};
    location / {
       root /var/www/html;
       index index.html;
    }
}
Applying the Role
To apply this role, you would run your playbook:
ansible-playbook -i hosts.ini site.ymlWhere site.yml includes the role as shown earlier. This command installs nginx, copies the configuration file, and ensures the service is running, all based on the tasks defined in the role.
Conclusion
By now, you should have a solid understanding of how to use Ansible to automate tasks like a pro. In this article, you have learned Ansible basics, its set-up, and how to write an Ansible playbook. With practice, you’ll become an Ansible expert in no time.
Next Steps for Mastering Ansible
To continue your Ansible journey, explore advanced topics like custom modules, Ansible Tower, and integrating Ansible with CI/CD pipelines. For more articles on DevOps, Please go to my DevOps article page.
FAQs
What is Ansible used for?
Ansible is an automation tool that simplifies tasks like configuration management and application deployment. It’s agentless, easy to use, and helps reduce human error.
What is Ansible in DevOps?
Ansible is an open-source automation tool widely used in DevOps for automating tasks like software provisioning, configuration management, and application deployment. It enables teams to manage infrastructure as code, ensuring consistency, scalability, and efficiency across environments. Ansible’s agentless architecture, simple YAML syntax, and flexibility make it a powerful tool for streamlining DevOps processes and accelerating deployment cycles.
What is Ansible vs. Jenkins?
Ansible and Jenkins are both essential tools in the DevOps ecosystem, but they serve different purposes. Ansible is primarily an automation tool used for configuration management, software provisioning, and application deployment. It allows you to automate tasks across your infrastructure using simple, agentless playbooks written in YAML.
On the other hand, Jenkins is a continuous integration and continuous delivery (CI/CD) tool. It automates the process of building, testing, and deploying code, helping developers integrate changes more frequently and reliably. While Ansible is focused on infrastructure and application automation, Jenkins is designed to automate the software development lifecycle.
In summary, Ansible is best suited for automating IT operations and managing infrastructure as code, while Jenkins excels in automating the CI/CD pipeline, facilitating continuous integration and delivery of software.
What is Ansible best for?
Ansible is best for automating IT tasks and managing infrastructure as code. It excels in areas such as configuration management, application deployment, and orchestration. With its simple YAML syntax and agentless architecture, Ansible is ideal for streamlining repetitive tasks, ensuring consistency across environments, and deploying applications efficiently. It is particularly effective for managing complex infrastructure setups, automating cloud provisioning, and integrating with other DevOps tools to create seamless automation workflows.
How long does it take to learn Ansible?
You can get started with Ansible in a few hours, but mastering it may take weeks to months, depending on your experience and the complexity of your environment.
Can Ansible be used for cloud automation?
Yes, Ansible is widely used for automating cloud infrastructure on platforms like AWS, Azure, and Google Cloud.
Is Ansible better than other automation tools?
Ansible’s simplicity and agentless architecture make it a popular choice, but the best tool depends on your specific needs and environment.
What are some advanced resources to learn Ansible?
Check out the official Ansible documentation, online courses, and community forums to deepen your knowledge.
Happy automating!